Set Custom Base PDF in Make.com
This guide explains how to use a custom PDF document when creating submissions via Make.com. This feature allows you to dynamically provide a different PDF file for a submission while leveraging an existing template’s field configuration.
When to Use Custom Base PDF in Make.com?
Section titled “When to Use Custom Base PDF in Make.com?”Using a custom base PDF is ideal when you need to maintain a consistent field structure (e.g., signature boxes, date fields in fixed positions) across documents that have different underlying content. Here are some common automation use cases:
- Dynamic Documents from External Sources: When the main document is generated by another system (like Canva, Google Docs, or Airtable) and needs to be signed.
- Personalized Contracts: For generating agreements where recipient data is already merged into the PDF document.
- Variable Document Length: When the number of pages differs from the original template, but the fields are on pages that exist in both.
- Automated Workflows: When your Make.com scenario generates or retrieves PDFs that need to be sent for signature.
The new PDF must have a similar structure to the template’s original document, ensuring that the predefined field locations are still valid.
Prerequisites
Section titled “Prerequisites”- An existing FillFaster template with fields configured
- A Make.com scenario that creates submission links
- A PDF file (as buffer data) that you want to use as the custom base PDF
- The new PDF must contain at least the same number of pages as the original template
Combining with PDF Placeholder Tags
Section titled “Combining with PDF Placeholder Tags”This feature is especially powerful when combined with Automatically Detecting PDF Placeholder Tags.
You can generate a completely dynamic PDF document that includes placeholder tags (e.g., {signature}, {date_today}, {name}). When you send this PDF as a custom base PDF, FillFaster will automatically detect these tags and convert them into interactive fields for the recipient to fill out.
This allows for a fully automated and dynamic document generation workflow in Make.com.
Step-by-Step Guide
Section titled “Step-by-Step Guide”Step 1: Create Your Make.com Scenario
Section titled “Step 1: Create Your Make.com Scenario”Set up your Make.com scenario with the FillFaster module “Create a Submission Link”. If you haven’t connected FillFaster to Make.com yet, see Connect FillFaster to Make.com.
Step 2: Configure Basic Settings
Section titled “Step 2: Configure Basic Settings”- In the FillFaster “Create a Submission Link” module, select your template
- Configure your prefill data and other basic settings as needed
Step 3: Set Up Advanced Settings
Section titled “Step 3: Set Up Advanced Settings”- Scroll down to the Advanced settings section in the module
- Locate the “Replace the base PDF file” field
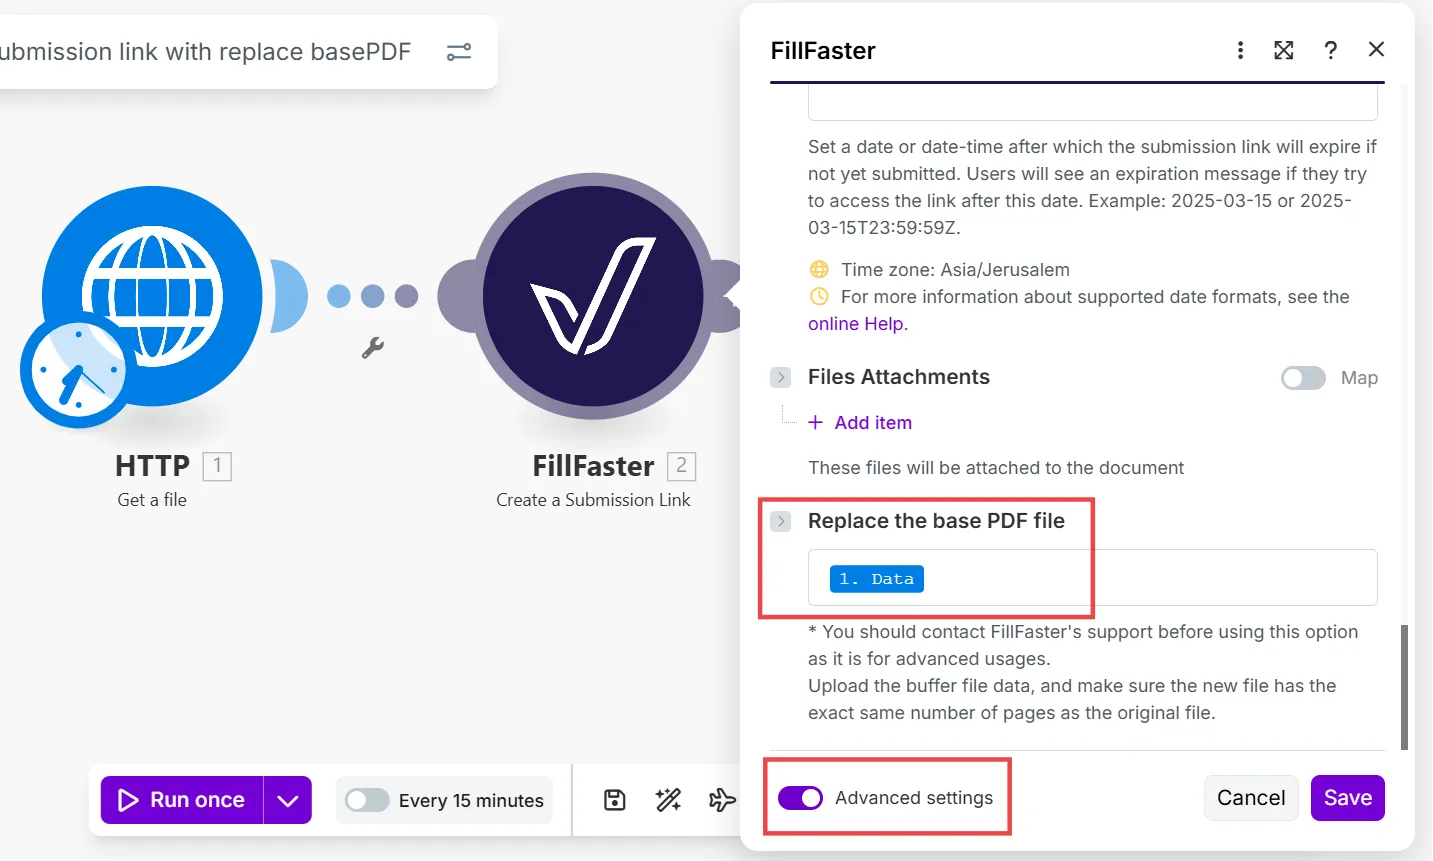
Step 4: Map the PDF Buffer Data
Section titled “Step 4: Map the PDF Buffer Data”In the “Replace the base PDF file” field, you need to map only the buffer data of your PDF file from a previous Make.com module.
Important: Map only the buffer/binary data, not the entire file object. This typically comes from:
- Download a file module
- HTTP module response
- Google Drive/Dropbox download module
- Any module that outputs file buffer data
Example mapping:
Previous Module > Data (buffer)Step 5: Complete and Test
Section titled “Step 5: Complete and Test”- Complete the rest of your module configuration
- Run your scenario to test
- Verify that the submission link uses your custom PDF with the correct fields
Common Use Cases
Section titled “Common Use Cases”Example 1: Priority Software Documents
Section titled “Example 1: Priority Software Documents”- Export a document from Priority (invoice, delivery note, purchase order, etc.)
- Convert to PDF using Make.com
- Download the PDF
- Map the PDF buffer to the “Replace the base PDF file” field
- FillFaster adds signature fields to the customized document
Example 2: Google Docs to PDF Workflow
Section titled “Example 2: Google Docs to PDF Workflow”- Fill a Google Docs template with customer data
- Convert to PDF using Make.com’s Google Docs module
- Download the PDF
- Map the buffer to create a submission link with the custom PDF
- Send for signature with predefined field locations
Example 3: Airtable-Based Agreements
Section titled “Example 3: Airtable-Based Agreements”- Retrieve agreement data from Airtable
- Generate a PDF using a PDF generation service
- Map the PDF buffer to FillFaster
- Create submission link with customer-specific agreement
Important Tips
Section titled “Important Tips”- Buffer Data Only - Always map just the buffer/binary data, not the entire file object
- Document Structure - Ensure the new PDF has the same structure as your template
- Page Count - The custom PDF must have at least as many pages as the template
- Field Locations - Fields must be in the same relative positions
- Testing - Always test your scenario with sample data before production use
Troubleshooting
Section titled “Troubleshooting”Issue: “Invalid PDF format” error
Section titled “Issue: “Invalid PDF format” error”Solution: Make sure you’re mapping only the buffer data, not the entire file object.
Issue: Fields appear in wrong locations
Section titled “Issue: Fields appear in wrong locations”Solution: Verify that your custom PDF has the same page structure and dimensions as the original template.
Issue: Missing fields
Section titled “Issue: Missing fields”Solution: Ensure your custom PDF has at least the same number of pages as the template.
Summary
Section titled “Summary”Using custom base PDF in Make.com allows you to create fully automated workflows that combine dynamic document generation with FillFaster’s signature and form-filling capabilities. This is a powerful feature for building end-to-end document automation solutions.